Detailed step by step guide: How to use Midi4Fun to convert MIDI / karaoke file in a format suitable for CASIO Musical Keyboard training system
1. How to find karaoke or MIDI files for training.
To make your training interesting, it is necessary to find a good song or track with notes. You may choose children's songs, lyrical, romantic songs, rock, chanson, pop music, classics, etc.
First approach. Visit specialized web-sites (for example, www.allmidifiles.com), where there are many MIDI and karaoke files, find and download the needed files (with .mid .kar extension). To find another web-sites of this kind google for "karaoke for computer".
Second approach. In a search engine type the name of the needed song or backing track and add "midi" or "karaoke". For example:
midi "yellow submarine"
or:
karaoke "yellow submarine"
Third approach. Visit a store with computer CDs and ask for a CD with karaoke or Midi songs. For example, such CDs may have the following text on their cover: A collection including many songs for your computer. A new collection of popular songs which will make any party rock. This CD has many songs of both national and foreign singers and bands. Hits in various styles (disco, rock, rap, pop), romances, children's songs, famous hits of foreign performers. A convenient search system (by title and by performer), alphabetical classification. Enjoy the music, improve your mood! The best and biggest collection. Everyone will like it.
2. Select the source file
Run Midi4Casio. In the main menu, select "File" -> "Convert MIDI / Karaoke to CASIO format"
In the dialog box, click 'Browse' (1) and select the source MIDI or Karaoke file on your computer with the extension (. mid or. kar). Then click 'Next' (2).
3. Assigning channels to the right / left hand
3.1. Selecting MIDI channels for left and right hands
Each MIDI/karaoke file loaded in the program has several music tracks (2). Each track may have its own instrument (3). On one track there may be the right-hand part, on another - the left-hand part, on other tracks there may be the solo part or the melody.
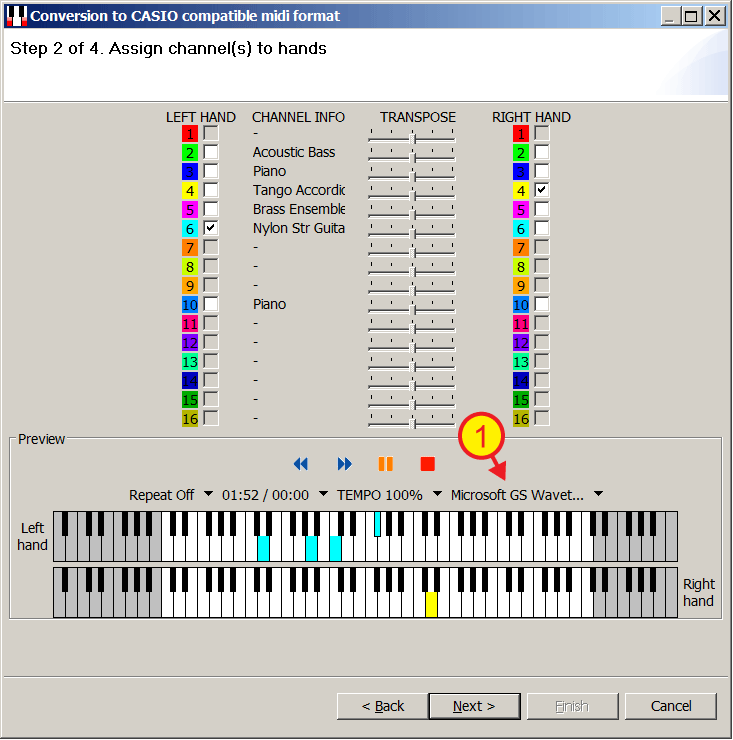
In order to understand which music track you want to study, press the "Play/Pause" button to start the song (1). If there is no sound from the speakers connected to the computer, check volume settings in Windows (see the last item of this guide).
In the opened window there are all parts (tracks/midi channels) which are available for the loaded file. There may be 16 such parts (the MIDI standard limitation). If you check (4) any channel, all notes which are playing on this channel will be displayed on the screen music keyboard and marked with the color corresponding to the channel color (5).
Selecting and deselecting each channel you choose the music part which you wish to study on your Musical Keyboard/MIDI keyboard. For example, for the selected song we want to learn to play 6 channel for left hand and channel 4 for right hand. Check this channels and leave the rest blank.
3.2. Transpose (shifting left/right by octave)
Using transpose controls (6) you can shift all the notes on each channel to the right or left for 1-2 octaves. This convenient feature can be used if the number keys of your instrument is less than the number of piano keys, and not all music tracks are placed in the range of your musical keyboard.
3.3. Other controls
Using the controls (7) you can also control playback of the selected song:
- Forward and rewind.
- Setting the repeat playback of songs or entire selection.
- Setting the start / end of the fragment, go to start / end of the fragment.
- Adding the position in the list, delete position from the list, go to one of the stored items.
- Tempo control.
- Selecting the main playback device.
4. Lesson phrases info
The song will be divided into phrases USING POSITIONS, added at the previous step. Here you can check list of phrases.
5. Selecting of the destination file name and path
On this step, you can specify the destination file name. This file is in a special format suitable for loading into synthesizers CASIO. Only following settings will be taked into account during conversion:
- Selected channels for the right and left hands.
- Specified individually for each channel the values of transposition by octaves.
- List of added positions.
By default, the program will add "_CONVERTED" suffix to your source file name. If you are happy with this name, then just click "Finish" (3). If not, then change the name and path to the file manually (1) or by clicking on Browse (2).
After clicking "Finish" (3) suitable for loading into a synthesizer CASIO file will be created. Use SD card or USB connection to download this file to the your Musical Keyboard (see your instrument user's guide for details).
6. If no sound
If you click Play / Pause button and no sound in the speakers connected to your computer, read the following two subsections.
6.1. Check the sound settings of the operating system

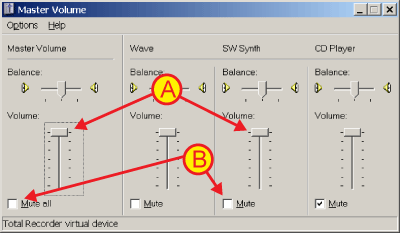
If there is no sound from the speakers connected to the computer, check volume settings in Windows (see the picture). The sound is influenced by the general and corresponding to MIDI device volume controls (A), and by the mute buttons (B), which must be left blank (without a check). The MIDI device usually corresponds to the controls marked as MIDI, SW Synth or something similar. If there is still no sound check 'Main MIDI playback device' settings (see following section).
6.2. Main MIDI playback device
On this step you may choose the main MIDI playback device (1). When you press the button (1) you will see the list of MIDI devices available for playback.
What does 'Main MIDI playback device' mean? When you choose a MIDI or a KARAOKE file for playing, the notes saved in this file follow the given way:
| Notes from the played KaraKEYoke file | > | Chosen Main MIDI playback device | > | Speakers connected to your computer |
Thus, the Main MIDI playback device transforms notes into the sound, or "synthesizes" the sound. In a modern computer sound synthesis may be hardware or software. The sound card installed in a computer is responsible for hardware synthesis. And software synthesis is controlled by the so-called "Software synthesizer" installed in the system. And when you press the button (1), a list of such hardware or software synthesizers which are available in your system is displayed. In the given example we see that on the computer there are the following available synthesis devices:
- Device not selected - you may choose this line if there is no need to choose any other device from the list.
- USB Audio Device - this device corresponds to the Musical Keyboard which is USB connected to the computer. It may be called MK USB OUT 1 or in any other way with the word "USB". If you choose this device the sound will come from the speakers of the connected instrument. You can choose it as the main playback device for training. Also, it should be used further on when you set up the connection of your musical instrument.
- Unknown name - an unknown device under an unknown name. No one knows how and why it got into the computer. :)
- MPU-401 - if you choose this device the notes will be directed to MIDI connector of the motherboard, to which various MIDI devices may be connected.
- A: SB Live! MIDI Synth - this is a hardware synthesis device. If you choose this device the sound will be synthesized by the sound card installed in the computer. This device appeared in the system after the "SB Live!" sound card was installed in the computer.
- B: SB Live! MIDI Synth - same as A: SB Live! MIDI Synth, but this is the second synthesizer independent from the first one.
- SB Live! MIDI UART - if you choose this device the notes will be directed to MIDI connector, located on the sound card of the computer.
- Yamaha XG WDM SoftSynthesizer - the software synthesizer "Yamaha" additionally installed in Windows.
- Microsoft GS Wavetable SW Synth - it is a standard Windows device of software synthesis from Microsoft.
- Yamaha XG WDM SoftSynthesizer ( - this device appeared after installation of the software synthesizer "Yamaha".
The list of the devices may vary on different computers, but with the example above it will be easier to understand what is what.


