
Using KaraKEYoke - Step By Step Guide
- 1. What you need to start.
- 2. How to find karaoke or MIDI files for training.
- 3. Playing the chosen MIDI/KARAOKE file
- 4. Main MIDI playback device
- 5. Choosing a music track for training
- 6. Connecting the Musical Keyboard or MIDI keyboard to your computer
- 7. Connection settings of a Musical Keyboard or a MIDI keyboard to the computer
- 8. Training
- 9. How to choose a fragment for training
- 10. Controlling the program windows and panels
- 11. Hot keys
This step by step guide explains how to learn to play the Musical Keyboard, to learn to play the MIDI keyboard, to learn to play the piano using KaraKEYoke Karaoke training program.
This guide may also be used by those who want to sing karaoke songs only. In this case you should omit articles 6-8 of the guide, which concern teaching how to play the Musical Keyboard / MIDI keyboard.
1. What you need to start.
- A Musical Keyboard. How to choose a Musical Keyboard. KaraKEYoke may function in interactive learning mode (i.e. wait till you press the correct key) with any Musical Keyboard having a MIDI output (a standard 5-pin or USB connector) or with any MIDI keyboard connected to a computer. Music keys, which a learning person must press, will be displayed on the computer screen.
It is very convenient when the needed keys are lighted on the Musical Keyboard. At present, "CASIO" is the only company which produces such Musical Keyboards; these are instruments of "Casio LK" series. KaraKEYoke is compatible with such keyboard instruments, and the keys are lighted not only on the computer screen but also on a Musical Keyboard! Any models having MIDI interface are recommended. - A computer. If Musical Keyboard does not support USB connection, there must be any modern sound card with MIDI interface for Musical Keyboard or MIDI keyboard connection.
- KaraKEYoke training program, which you may download here.
2. How to find karaoke or MIDI files for training.
To make your training interesting, it is necessary to find a good song or track with notes. You may choose children's songs, lyrical, romantic songs, rock, chanson, pop music, classics, etc.
First approach. Visit specialized web-sites (for example, www.allmidifiles.com), where there are many MIDI and karaoke files, find and download the needed files (with .mid .kar extension). To find another web-sites of this kind google for "karaoke for computer".
Second approach. In a search engine type the name of the needed song or backing track and add "midi" or "karaoke". For example:
midi "yellow submarine"
or:
karaoke "yellow submarine"
Third approach. Visit a store with computer CDs and ask for a CD with karaoke or Midi songs. For example, such CDs may have the following text on their cover: A collection including many songs for your computer. A new collection of popular songs which will make any party rock. This CD has many songs of both national and foreign singers and bands. Hits in various styles (disco, rock, rap, pop), romances, children's songs, famous hits of foreign performers. A convenient search system (by title and by performer), alphabetical classification. Enjoy the music, improve your mood! The best and biggest collection. Everyone will like it.
3. Playing the chosen MIDI/KARAOKE file

Run KaraKEYoke. In the "Local Hard Drives" tab (1) select MIDI or Karaoke file on your computer with the extension *. kar and *. mid (several files can be downloaded from here). Double-click the selected file with the mouse or press 'Enter'. The file will be loaded and immediately start playing. The lyrics will be displayed on the screen (3) if any.
If there is no sound from the speakers connected to the computer, check volume settings in Windows (see the picture). The sound is influenced by the general and corresponding to MIDI device volume controls (A), and by the mute buttons (B), which must be left blank (without a check). The MIDI device usually corresponds to the controls marked as MIDI, SW Synth or something similar. If there is still no sound check 'Main MIDI playback device' settings (see following section).
To control playing you may use buttons (4) "Play/Pause", "Stop", "Rewind", "Fast Forward", "Next song in the playlist", "Previous song in the playlist".
In the Mixer panel you can see following controls:
- For all channels (5): tempo, key controls and general volume control.
- For the selected channels for training (6) it is possible to set volume and change instrument;
- Individually for each MIDI channel (7):
- MIDI channel number is displayed at the top;
- If you check Training button, all notes which is played on this channel at the present moment will be displayed on the screen music keyboard and marked with the color corresponding to the channel color.
- Button "Notation" allows choosing the channel which notes will be shown in the "Notation" panel.
- The Instrument button allows changing the Instrument for the channel.
- Notes Transposing control allows transposing by octaves (shifting left/right by octave).
Most all channels controls have "hot keys" which are keys combinations on the keyboard. For example, the "Play/Pause" button corresponds to the "Space" button on the keyboard. You may find the full list of hot keys in the corresponding section of this guide.
| Tip: If you intend to use the program for karaoke only, it will be convenient and useful to enlarge your main panel where the lyrics are displayed. Please refer to the section "Controlling the program windows and panels". |
4. Main MIDI playback device

In KaraKEYoke you may choose the main MIDI playback device (1). When you press the button (1) you will see the list of MIDI devices available for playback (2).
If the Musical Keyboard is connected to your computer, and you plan to use the software for training on a Musical Keyboard then choose the device corresponding to the connected Musical Instrument (USB Audio Device or another depending on connection).
If you plan to use the program only for karaoke singing then choose any device at which you will like a sound during song playing. In the given example it is possible to choose devices Microsoft GS Wavetable SW Synth or Yamaha XG WDM SoftSynthesizer or A: SB Live! MIDI Synth or B: SB Live! MIDI Synth.
If there were difficulties, read further this section if all ок, pass to the following.
What does 'Main MIDI playback device' mean? When you choose a MIDI or a KARAOKE file for playing, the notes saved in this file follow the given way:
| Notes from the played KaraKEYoke file | > | Chosen Main MIDI playback device | > | Speakers connected to your computer |
Thus, the Main MIDI playback device transforms notes into the sound, or "synthesizes" the sound. In a modern computer sound synthesis may be hardware or software. The sound card installed in a computer is responsible for hardware synthesis. And software synthesis is controlled by the so-called "Software synthesizer" installed in the system. And when you press the button (1), a list of such hardware or software synthesizers which are available in your system is displayed. In the given example we see that on the computer there are the following available synthesis devices:
- Device not selected - you may choose this line if there is no need to choose any other device from the list.
- USB Audio Device - this device corresponds to the Musical Keyboard which is USB connected to the computer. It may be called MK USB OUT 1 or in any other way with the word "USB". If you choose this device the sound will come from the speakers of the connected instrument. You can choose it as the main playback device for training. Also, it should be used further on when you set up the connection of your musical instrument.
- Unknown name - an unknown device under an unknown name. No one knows how and why it got into the computer. :)
- MPU-401 - if you choose this device the notes will be directed to MIDI connector of the motherboard, to which various MIDI devices may be connected.
- A: SB Live! MIDI Synth - this is a hardware synthesis device. If you choose this device the sound will be synthesized by the sound card installed in the computer. This device appeared in the system after the "SB Live!" sound card was installed in the computer.
- B: SB Live! MIDI Synth - same as A: SB Live! MIDI Synth, but this is the second synthesizer independent from the first one.
- SB Live! MIDI UART - if you choose this device the notes will be directed to MIDI connector, located on the sound card of the computer.
- Yamaha XG WDM SoftSynthesizer - the software synthesizer "Yamaha" additionally installed in Windows.
- Microsoft GS Wavetable SW Synth - it is a standard Windows device of software synthesis from Microsoft.
- Yamaha XG WDM SoftSynthesizer ( - this device appeared after installation of the software synthesizer "Yamaha".
The list of the devices may vary on different computers, but with the example above it will be easier to understand what is what.
So what device is better?
If the Musical Keyboard is connected to your computer, and you plan to use the program for training on a synthesizer then choose the device corresponding to the connected musical instrument (USB Audio Device or another depending on connection).
If you don't like the sound synthesized by yours Musical Keyboard, then choose another device that the sound was from loudspeakers, connected to the computer. Software synthesis devices function with a delay as they need time for synthesizing the sound. Such delay will be remarkable when we connect a Musical Keyboard/a MIDI keyboard to our computer for training. That is why in the dropdown list (2) you should choose any hardware synthesis device - in our example it is A: SB Live! MIDI Synth or B: SB Live! MIDI Synth.
If you plan to use the program only for karaoke singing then choose any device at which you will like a sound during song playing.
5. Choosing a music track for training
Each MIDI/karaoke file loaded in the program has several music tracks (1). Each track may have its own instrument. On one track there may be the right-hand part, on another - the left-hand part, on other tracks there may be the solo part or the melody.
In order to understand which music track you want to study, press the "Play" button to start the song.
In the "Mixer" panel there are all parts (tracks/midi channels) which are available for the loaded file. There may be 16 such parts (the MIDI standard limitation). If you check (2) any channel, all notes which is played on this channel at the present moment will be displayed on the screen music keyboard and marked with the color corresponding to the channel color (3).
Selecting and deselecting each channel you choose the music part which you wish to study on your Musical Keyboard/MIDI keyboard. For example, you wish to learn how to play the piano (solo) and chosen song is "Besame mucho". Selecting the channels you see that solo is recorded on channel 2, the green one. Check this channel and leave the rest blank.
| Tip: Even if you do not intend to use the program for learning how to play the keyboard instrument, following the solo part during karaoke singing helps distinguish the notes and educate your ear to music. |
6. Connecting the Musical Keyboard or MIDI keyboard to your computer
6.1. Connecting a Musical Instrument with USB interface to the computer
Please refer to the user's guide of your instrument for detailed information on connecting a Musical Keyboard or a MIDI keyboard to the computer. For most new models of Musical Keyboards with USB interface and computers with Windows XP you need only to simply connect the instrument and the computer with the help of a USB cable. The system will recognize the new device connected via USB. For some models you will need to install the driver which is supplied on the compact disk together with the instrument. For example, to connect Casio LK-300 (and all other Casio models with USB interface) to your computer you will need to do the following:
- Finish all unnecessary programs on the computer;
- Insert the compact disc which is supplied together with the Musical Keyboard in the computer;
- Turn the Musical Keyboard off;
- Connect the Musical Keyboard to the computer via USB cable;
- Turn the Musical Keyboard on;
- Follow the instructions on the screen rejecting downloading the updated drivers from the Internet; choose loading of the USB-MIDI driver from the compact disk.
6.2. Connecting a Musical Instrument with MIDI interface (5-point connector) to the computer
For models with a MIDI connector you need to use a MIDI cable which you may purchase together with a Musical Keyboard. MIDI keyboards are usually supplied with a MIDI cable. In this case you will not need to install any additional software.
Turn the computer off. A MIDI cable usually has 3 connectors. On one side there are 2 small 5-point connectors, DIN5 standard. These connectors are used for connecting to a MIDI device. On the other side of the cable there is a 15-point connector. You need to connect this connector (see the picture) to the computer.


Find a counter 15-point connector of the D-SUB type on the rear side of the computer. If your computer has a sound card installed, there may be 2 such connectors - one of them is located on the motherboard, by the mouse and keyboard connectors, the other one - on the sound card. In this case you need to connect to the connector located on the sound card.
If you have a joystick or a gamepad, the needed connector must be occupied by it. You need to disconnect the joystick or the gamepad and connect the MIDI cable in this connector. If your computer has 2 connectors (on the motherboard and on the sound card), connect the joystick or the gamepad to the motherboard connector and the MIDI cable to the sound card connector. Do not forget to set up the joystick or the gamepad for the needed port in its configuration.
Now you need to connect the MIDI cable to the instrument with MIDI interface. There must be 2 or 3 MIDI connectors on the rear side of the instrument:
- MIDI IN - input;
- MIDI OUT - output;
- MIDI TROUGH - end-to-end channel. This connector is used for connecting several instruments to one MIDI bus. In our case you do not need this connector. Besides, it may simply be absent on your instrument.


After you connected the MIDI cable to the computer there are 2 connectors left:
- MIDI IN - input to the computer;
- MIDI OUT - output from the computer. The cord going to this connector is usually marked white or the connectors are marked.
Turn off the instrument and connect the connectors as follows:
Connect the cable MIDI OUT connector to the instrument's MIDI IN slot.
Connect the cable MIDI IN connector to the instrument's MIDI OUT slot.
Now all connections are completed. Turn the computer, the Musical Keyboard or the MIDI keyboard ON.
7. Connection settings of a Musical Keyboard or a MIDI keyboard to the computer
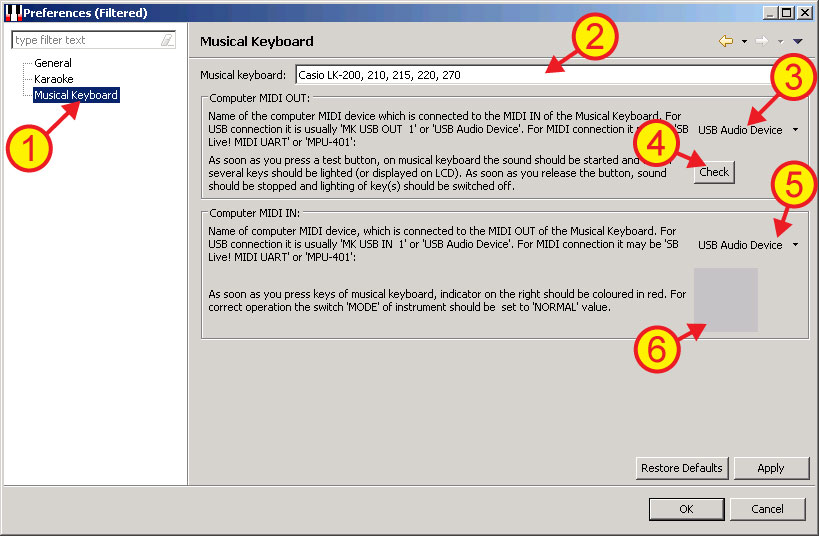
After you connected the Musical Keyboard to the computer (as described in the previous section), you need to choose the model of your keyboard instrument. In the program menu select File -> Settings, then in the window select "Musical keyboard" (1).
Then in the dropdown list choose the correct model of the Musical Keyboard connected to the computer (2), for example Casio LK-270. For MIDI key boards or Musical Keyboards which are not in the list, choose "Midi keyboard, * octaves" or "Musical Keyboard, * octaves".
After you choose the model, you have the possibility to check the connection and perform necessary settings for successful functioning of your Musical Keyboard and KaraKEYoke. You should make sure that signals pass both from the program to your Musical Keyboard and back. MIDI signal passing from KaraKEYoke to the Musical Keyboard is important because the program needs to light the necessary keys on the Musical Keyboard. MIDI signal passing from the Musical Keyboard to the computer is important because the program needs to know when you press the keys. Both are needed for KaraKEYoke training modes.
First you should indicate the "Name of the computer MIDI device which is connected to the MIDI IN of the Musical Keyboard" (3). There may be several such devices in the dropdown list, for example if the computer has several sound cards or if there are both external and internal sound cards.
In our example the instrument is connected via USB, that is why we choose 'USB Audio Device' in the list of all devices. If you connect other models made by Casio, Yamaha, Roland, etc, the name of the device may differ but usually it is similar to 'MK USB OUT 1' or 'USB Audio Device'.
| Tip: USB MIDI devices appear in Windows only after you connect the Musical Keyboard to the computer and turn the Musical Keyboard on. That is why in order to find the device in the list you need to connect the Musical Keyboard to the computer and turn the power of the Musical Keyboard on. |
If you connect via a MIDI cable, you should indicate the device corresponding to the MIDI connector which is connected to the MIDI cable. The name of such device may be similar to 'SB Live! MIDI UART' or 'MPU-401'. For example, if the instrument is connected to the connector of the installed sound card (recommended) then you should choose the MIDI device of the sound card. In our example the computer has the SB Live! sound card, that is why in the dropdown list we choose the midi device: "SB Live! MIDI UART".
To make sure that the device is selected correctly and that the signal from the computer is ok, press the "Check" button (4). After you press it the Musical Keyboard must produce a sound and some its keys must be lighted (if the function is available on your instrument). If it does not occur, try to choose another MIDI device (3). If it does not help, make sure that the connection to the computer is correct (refer to the previous section) and that the Musical Keyboard is turned on.
Now you should indicate the "Name of the MIDI device which is connected to the MIDI OUT of the Musical Keyboard" (5). There may be several such devices in the dropdown list, for example if the computer has several sound cards or if there are both external and internal sound cards.
If you connected via USB the list of the devices will include 'MK USB IN 1' or 'USB Audio Device', which should be selected.
If you connected via a MIDI cable the name of the device may be similar to 'SB Live! MIDI UART' or 'MPU-401'. For example, if the instrument is connected to the connector of the installed sound card (recommended) then you should choose the MIDI device of the sound card. In our example the computer has the SB Live! sound card, that is why in the dropdown list we choose the midi device: "SB Live! MIDI UART".
To make sure that the device is selected correctly and that the signal from the Musical Keyboard is ok, press any key on the Musical Keyboard. When you press a key the indicator (6) must turn red. If it does not occur, try to choose another MIDI device (5). If it does not help, make sure that the connection to the computer is correct (refer to the previous section) and that the Musical Keyboard is turned on.
Press "OK" to save the settings.
8. Training
If everything was OK in the previous section, you are ready for the training.
Press the "Play" button, choose the needed part for training and watch the keys of the chosen training channel are lighted on the musical keyboard on the screen and on the Musical Keyboard (if your Musical Keyboard has key-lighting feature).
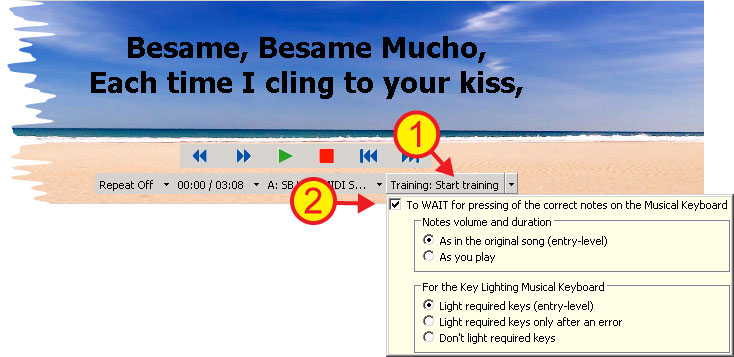
To start training press the button "Training:..." (1) and also choose a training mode "to Wait for pressing of correct notes on the Musical Keyboard" (2). In this mode the song will be played as long as the first note recorded on the selected channel is reached. After that the playing will stop and the note will be lighted both on the musical keyboard on the screen and on the Musical Keyboard. KaraKEYoke will wait till you press any key on your Musical Keyboard; then the playback will continue until the next note is reached.
Depending on the Musical Instrument connected to the computer will be accessible all or some options of training. To begin with we advise to choose the options marked as "entry-level". And all options of training are described below:
- Notes volume and duration.
- If you play on Musical Keyboard (not a MIDI Keyboard) to feel a difference in training modes "Notes volume and duration" it is possible only if on the Musical Keyboard loudness of a sound is established on a zero and in the program settings the Main MIDI Playback Device is different from MIDI OUT for the Musical Keyboard (that is the sound goes through dynamics of the computer, instead of through dynamics of a synthesizer).
- Notes volume and duration-> As in the original song (entry-level).
- In this mode by pressing a key of the Musical Keyboard sound will as in an original composition. Incorrectly pressed notes (which are not highlighted on the Screen Keyboard) will not sound in general.
- Notes volume and duration-> As you play.
- In this mode by pressing a key of the Musical Keyboard sound will as you press. For example if the Touch Response Musical Keyboard is connected, notes will sound more loudly if the key is pressed quickly. For increase in loudness of your play in comparison with all orchestra use a regulator of loudness for the selected channels. For Instrument change use the button of a choice of the Instrument for the chosen channels.
- For the Key Lighting Musical Keyboard-> Light required keys (entry-level).
- If you have connected to the computer a Key Lighting Musical Keyboard (CASIO LK for example) and the model of such Keyboard is chosen in program settings, the right keys will be lighted directly on a Keyboard.
- For the Key Lighting Musical Keyboard-> Don't light required keys.
- The right keys will be highlighted only on the Screen musical keyboard.
9. How to choose a fragment for training
It is easier to learn many songs, especially long ones, such as the "Moonlight Sonata", by parts. To do that you should choose a fragment for training in KaraKEYoke and set it for repeating.
Start the song, reach the part which you wish to learn and press "Pause" (1).
Press the button "Position and selection control" (2) and select "Set beginning of selection" (3) in the dropdown menu. The program will memorize this position as the starting point of the fragment.
Press "Play/Pause" (1) to continue the playback, reach the position where you want to stop and press "Play/Pause" to stop the playback.
After it press "Position and selection control" (2) and select "Set end of selection" (4) in the dropdown menu. The program will memorize this position as the end of the fragment.
Now press "Stop" and choose the repeating mode "Repeat selection" by pressing the repeating mode button (5). Then press "Play/Pause" (1) and you can learn the notes of the chosen fragment.
10. Controlling the program windows and panels
The program window consists of panels "Play List", "the Musical keyboard", "Notation", "Mixer". You can change the sizes of panels. For this purpose simply establish a mouse cursor on border of panels and drag this border keeping the left button of a mouse. That else it is possible to do with panels it is shown on example of "Play List" panel:
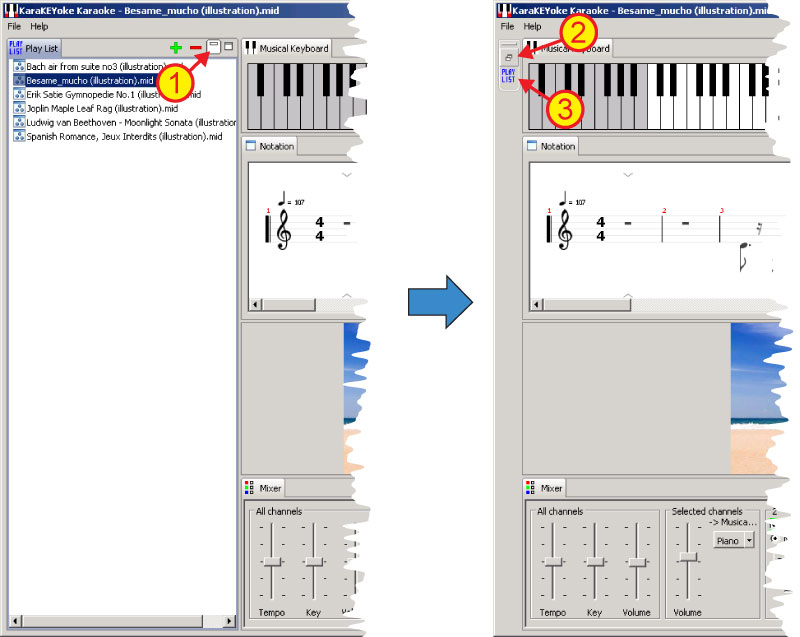
Press button "Minimize" (1) for minimizing the panel. Press the button "Restore" (2) for restoring earlier minimized panel. Press button (3) for temporarily showing earlier minimized panel. The panel will minimized again at a mouse click on any place out of the panel.
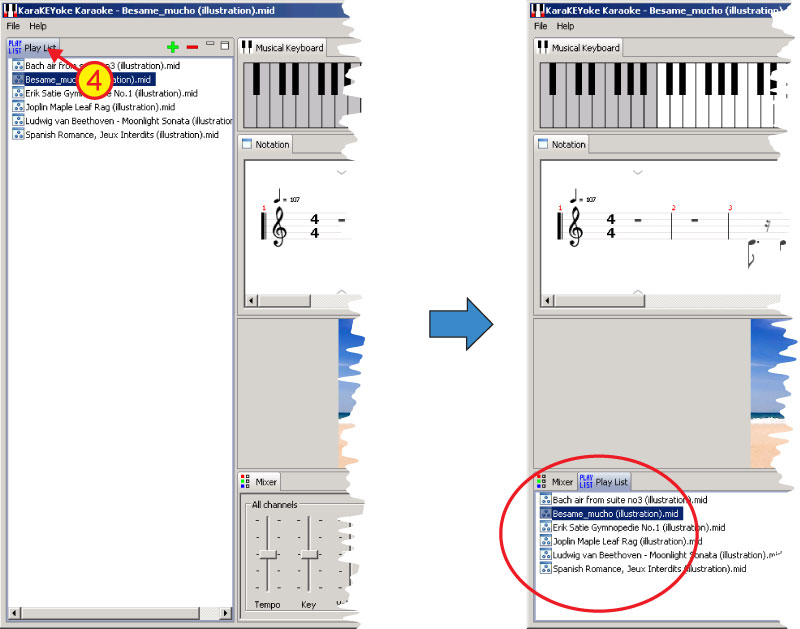
You can drag the panel in other place of a program window. For this purpose take by mouse a label of the panel (4) and move the panel to a new place keeping the left button of a mouse.
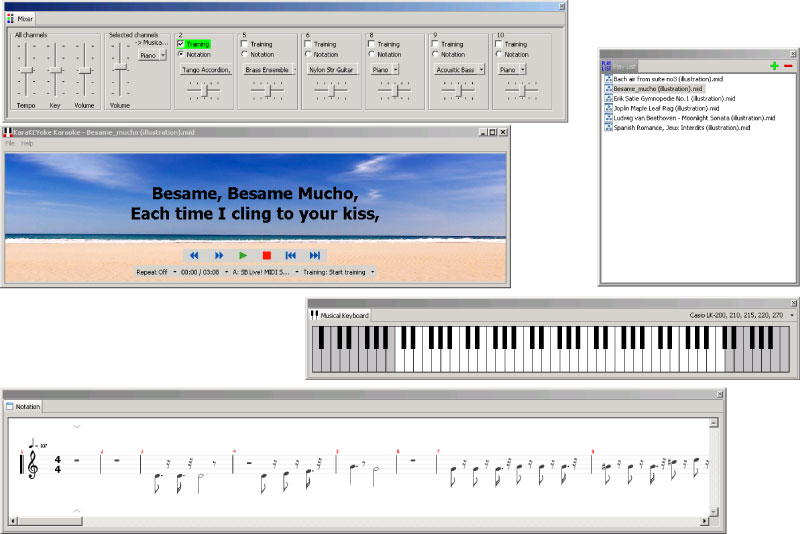
You can make the panel a separate window. For this purpose take by mouse a label of the panel (4) and move the panel to a new place outside of a program window keeping the left button of a mouse. After it you may change the sizes and the positions of thisl windows independently.
11. Hot keys
| Key combination | Alternative key combination | Operation |
|---|---|---|
| Space | Play / Pause | |
| ESC | Stop | |
| Ctrl + N | F4 | Next song in playlist |
| Ctrl + P | F3 | Previous song in playlist |
| Right arrow | Fast forward for 10 seconds | |
| Left arrow | Rewind for 10 seconds | |
| + | Transpose up by One Semitone | |
| - | Transpose down by One Semitone | |
| NUM * | > | Increase tempo (speed) |
| NUM / | Decrease tempo | |
| [ | Lower volume (Softer) | |
| ] | Increase volume (Louder) |